
![Modifying Tekken 7 UI files Tutorial (Advanced) [UPDATED]](https://dist.tekkenmods.com/dist-cache/1920/40/posts/53/thumbnails/785fcd43cb6134e7-1439x665.jpg)
Modding flash files can be a bit complicated which is why I made this guide. I will be separating it with different methods of modifying it each with their own specific uses. Modding swf files is mostly trial and error, Finding what each thing does and it's purpose. You can use the methods in here in any way you want as long as you know what you're doing.
Content
•  A. Introduction
• B. Pre-Requisites
•  C. Some Explanation
•  D. First Example
•  E. Second Example
•  F. Extra Step
•  G. Caveats
Introduction to the Flash files
SWF files is an Adobe flash file format used for animations and applets, It is popularly used by browser games hence the name "Flash games". Scaleform Corporation (now owned by Autodesk Gameware) a developer that provides middleware for video game developers, Adopted this idea and made their own version called Scaleform Gfx. It is an engine that renders vector graphics and used to display Flash based UIs, HUDs and video playback for Video Games. Users can then create SWF files inside Adobe Flash and convert it into GFx files optimized for use in game engines (e.g. Unity, Unreal Engine and CryEngine). Digging inside of it, contains the metadata, sprites, animations, frames, shapes and scripts.
Pre-Requisites
- Extracted UI files
JPEXS Free Flash Decompiler/FFdec - used for viewing or editing of the swf files
HxD Hex Editor - Hex editor used for this tutorial. You can use your own hex editor if you want.
Some Explanation to the common things inside the flash file. (from what I understand)
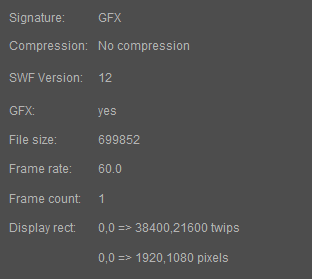
Header - This is the one that shows the information about flash file. Starting with the signature as GFX (the flash file always starts with it's signature in a hex editor), then the compression, what version it is (T7 uses swf version 12), the file size in decimal value (important later), Frame rate is self explanatory, then the display bounds.
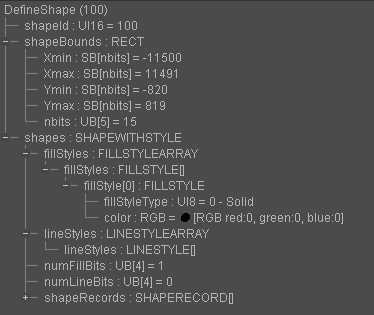
Shapes - Or a DefineShape tag is used to define a shape and later be used by a control tag like PlaceObject. DefineShape2 expands the limitations of DefineShape. Shapes are like a texture/image inside the flash file and most of the time they are made in the flash editor itself by using shape records instead of imported texture/image. As you can see in this example you can see the ShapeBounds option, by raw editing this setting you can either expand or shrink the area allowed for the texture to display. If the shape has a SHAPEWITHSTYLE option enabled it defines the look of the shape, Fill style are what changes the fill color of the shape. Then, Line styles are used for lines as you can see in this example it doesn't use one. Lastly, we got the shapeRecords this tells how the shape will look like this is mostly the important part of the shape as it tells how the shape should take form.
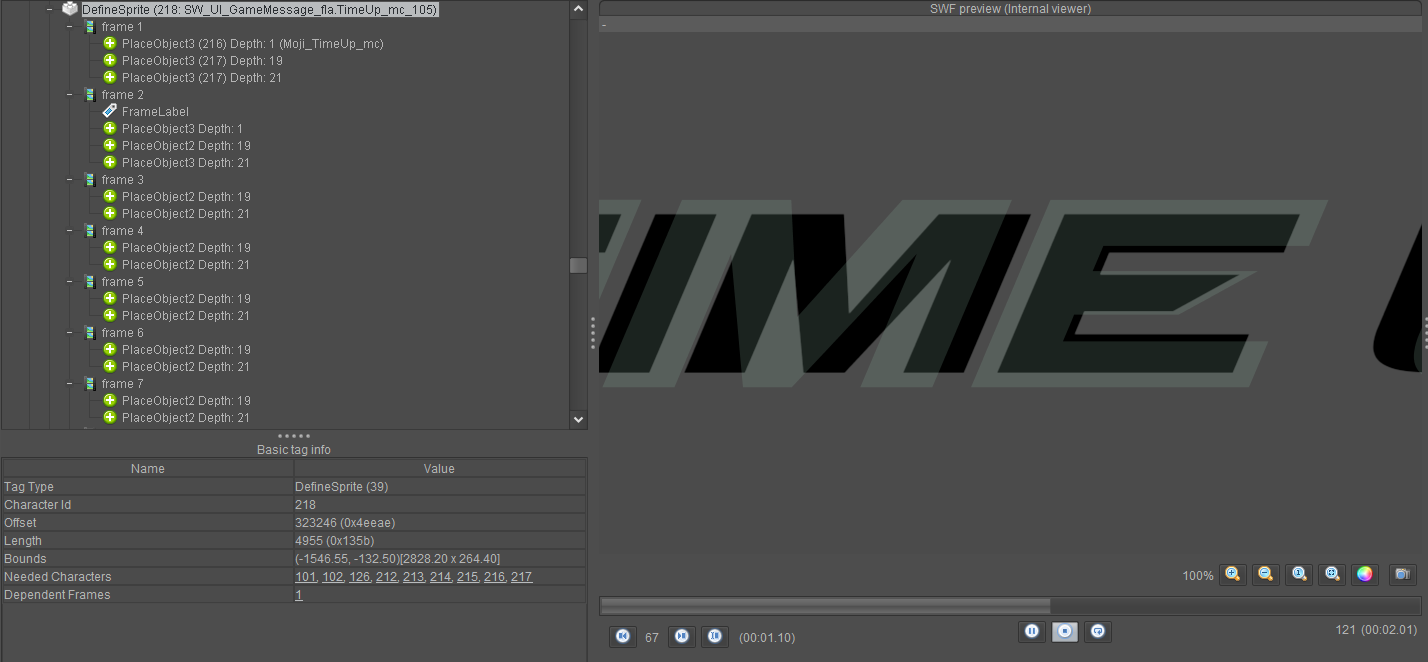
Sprites - Or a DefineSprite tag defines a sprite, It consists of an ID and a frame with a series of control tags. Each sprites has some basic tag info which also shows the Needed and Dependent Characters. Using the tags DefineSprite(1) and DefineSprite(2) as an example, DefineSprite(1) is a Needed Character for DefineSprite(2) to work. While DefineSprite(2) Is a Dependent Character for DefineSprite(1). This can also work on other tags too, such as frames, PlaceObjects and other Display List tags.
Frames - Also called as ShowFrame, The tag instructs the Flash renderer to show on screen it's display list. Often has Display Lists inside, When no tags are inside the display is paused or stays for the duration of a single frame.
Check this pdf out for better understanding and will help more with raw editing inside the jpexs editor.
SWF specification pdf file by Adobe: here
Notes: Tekken 7 flash files are commonly found in this directory: TekkenGame\Content\UI_common\flash You can find them by noticing it's naming convention with SW_UI at the start of the name.
First Example: Hex editing the SWF files by Nulling parts out.
This method uses the hex editor to null parts out of the flash file. I usually use this when deleting tags mainly on FFdec destroys the SWF file or it gets corrupted. With this method you also don't need to re-inject the flash file inside the uasset.
The Idea
Let's say I wanted to remove the side select background and leave Mokujin in the front. So I start making the pak then copy the folder structure, Then I put transparent textures on everything except the Mokujin texture(and the arrow). Somehow we're still left with something behind Mokujin, Even though we put transparent textures on all of it except Mokujin. This is where the flash file comes in.
As you can see in this picture it still left a texture behind Mokujin and we want it completely removed
Step 1:
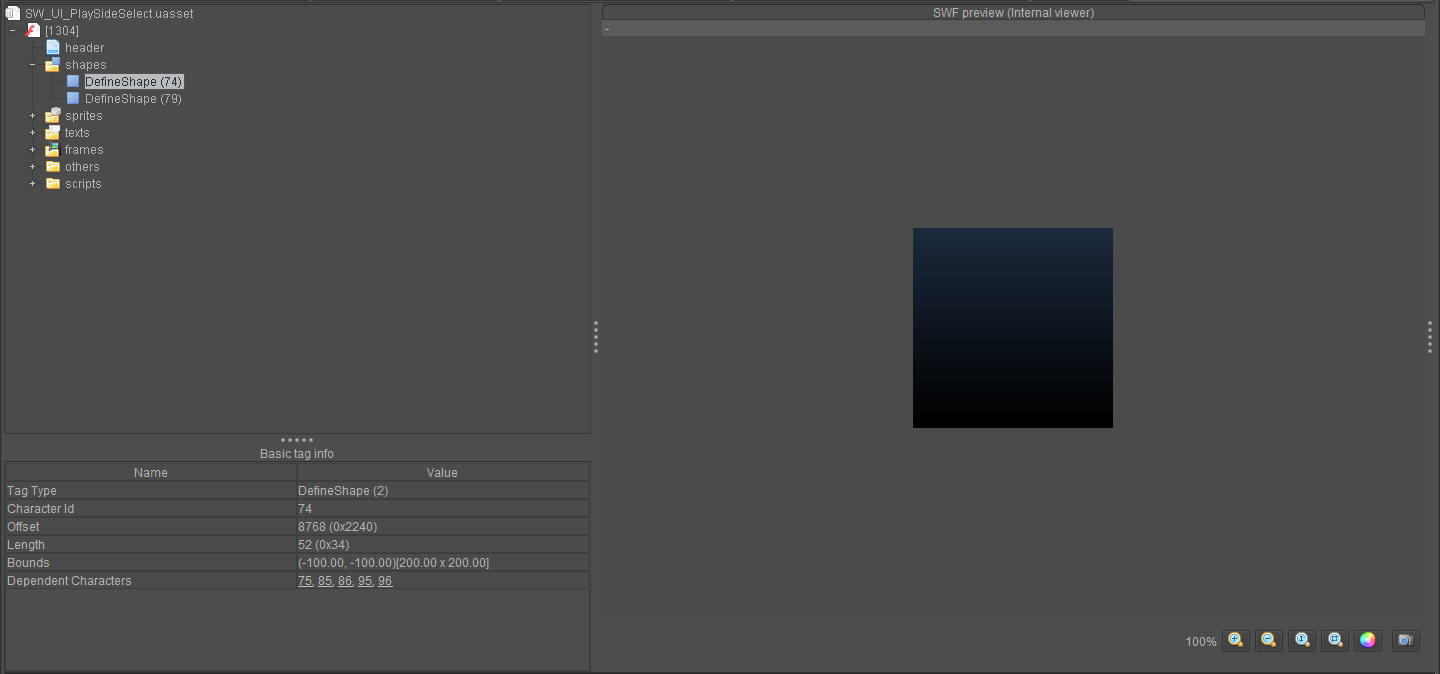
Make a copy of the original flash file we need to edit, In this case it's SW_UI_PlaySideSelect.uasset this is the file we're going to modify. Open up FFdec and drag and drop the flash file we need to modify, Do this for the hex editor too. Now, on FFdec let's find the shape that we want to remove behind mokujin. As most of the time you can easily find them in the shapes section like this one. We can see here that the shape has an ID number of "74" let's keep that in mind as it will be important later.
Step 2:
Now that we found out the shape we want to remove, Let's remove it by nulling it inside the hex editor. First, we need to find out where the shape is inside the hex editor. Go to the ribbon/upper section of the FFdec and as you can see there's different types of settings to change. Click Hex dump, This is important since this will tell us where we can find the shape data in hex.

Step 3:
It should open a hex viewer inside, Now as you can see the tags have an ID next to them. As I said earlier to remember the shape ID of "74" scroll till you find the shape with an ID of "74" . Click on it you can see that on the right side it gets highlighted which means we know now where it is. Expand the tag to see more, Then expand shapes(SHAPEWITHSTYLE). Now select shapeRecords(SHAPERECORDS) this the part we are gonna null out on the hex editor. Once selected you can see on the right side that the whole tag is separated by 3 colors and the last one which is the red one the shapeRecords. Note the first 4 hex values, In this case it's "15 90 61 06".

Step 4:
Open up the Hex editor and hit Ctrl+F and then select the Hex-values tab, Put the Search Direction on "All". Now paste the hex values we got earlier and click "Ok".

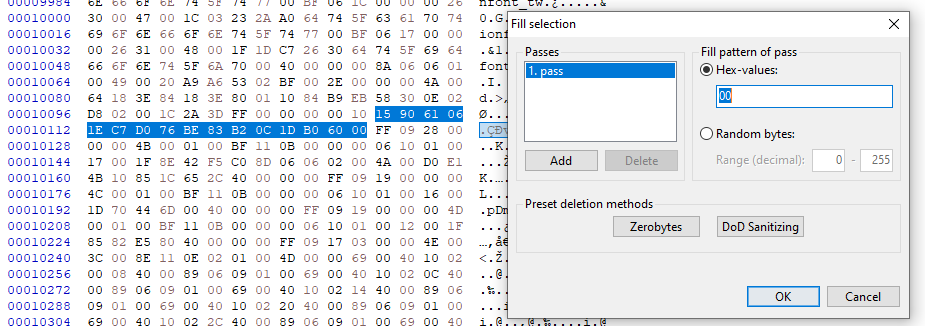
Now that we got the result click it and jump to the part we are gonna null out. Select the hex values from the red area earlier since this is the shapeRecords part.

Right click, Then Fill selection and click Ok (make sure settings are same as below), This will replace the hex value from earlier with a bunch of zeroes.
Now that it's done, That's it! click Ctrl+S on the hex editor to save it. It should make a backup file with .bak at the end and if you somehow messed up just remove the .bak on the name.

Here's the link if you want to inspect it or want to just use it lol.
Mod Link: Clean Side Select
Second Example: Removing or Deleting sprites, shapes or frames in FFDEC.
This method uses ffdec to straight up remove or manually edit sizes of sprites, frames, or even shapes inside the flash file. Due to this you either make the file size bigger or smaller, So when you re inject it back to the uasset this will inevitably crash the game, I'll explain a workaround to make this work.
The Idea
Let's say I wanted to remove the Tekken Prowess in the VS screen. Even though the bases are transparented the numbers and the letters are still there. We still need to manually remove them inside the flash file.
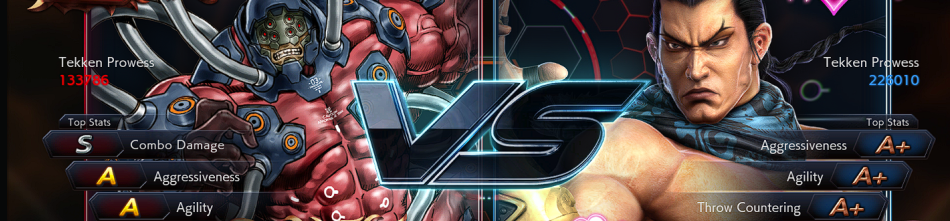
As shown in the picture the prowess is still there and we want to remove it.
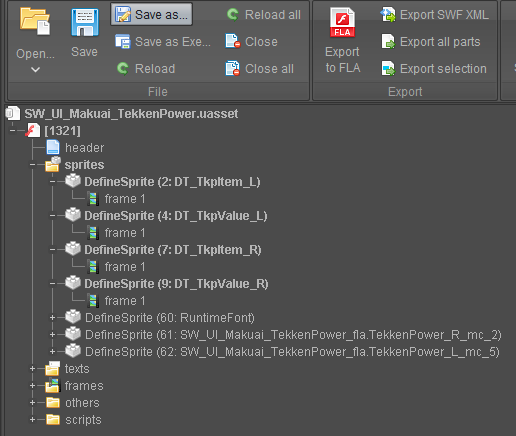
Step 1:
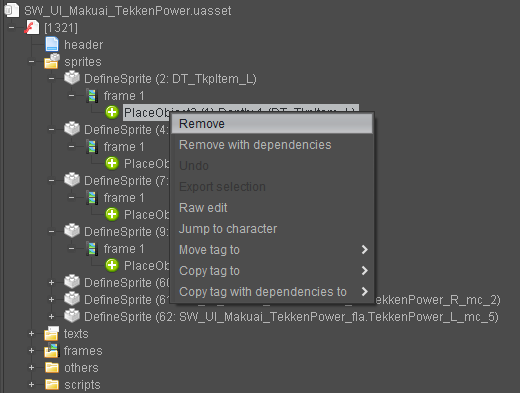
Same as earlier, Make a copy of the original flash file we need to edit. In this case it's SW_UI_Makuai_TekkenPower.uasset this is the file we're going to modify. Open up FFdec and drag and drop the flash file we need to modify, Do this for the hex editor too. Now let's find the tag that displays the text on the screen, We can see that there's 2 types one for each side Left and Right. Let's assume that DT_TkpItem_ is the "TekkenProwess" text, Based on the screenshot above. Then DT_TkpValue_ is the Prowess value itself. We also need to remove both sides the _L and the _R.

Step 2:
Now Let's try removing all 4 of them by Right-clicking and Click Remove. This will remove the tag that displays the text we want to remove.
Click Save as after removing the tag we wanted then select the files of type "Scaleform GFx files (.gfx)". Save it somewhere easily accessible for now as we will need to re-inject the flash file back to the uasset. For me I will just save it inside the folder of FFdec for now.
Step 3:
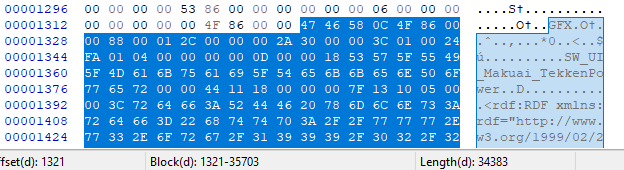
Open up the saved .gfx file from earlier onto the hex editor. Now we have both the uasset and the modified .gfx file we're going to re-inject back. Also make sure to change the "hex" from the ribbon above to "dec" this would help for later when we do a workaround for the changed file size. Do this also to the original uasset file.

Now, inside the uasset file we need to find where the flash file starts and ends. Remember that the signature always starts the flash file which is "GFX" which in hex values is "47 46 58". The flash file ends at an offset of "40 00 00 00 10" The 10 tells the game that the flash file ends here. I recommend to just search for the offsets at the bottom (Ctrl+F and search the Hex values) as it is easier to find the GFX signature at the start than the end. Put the cursor before the "10" then drag the scroll bar back up to the start and find the GFX signature, Now hold shift and left click before the GFX signature hex value starts. What you're highlighting right now is the whole flash file that's going to get replaced by the modified version we saved earlier.

Putting the cursor before the "10" as we don't want to remove that offset.

And then scrolling up to the GFX signature to highlight the whole flash file.
After selecting the whole flash file you can see at the bottom the length "34383" (Make sure you have changed the "hex" option to "dec"). Take a note of this as this tells us the original file size we need to keep.
Step 4:
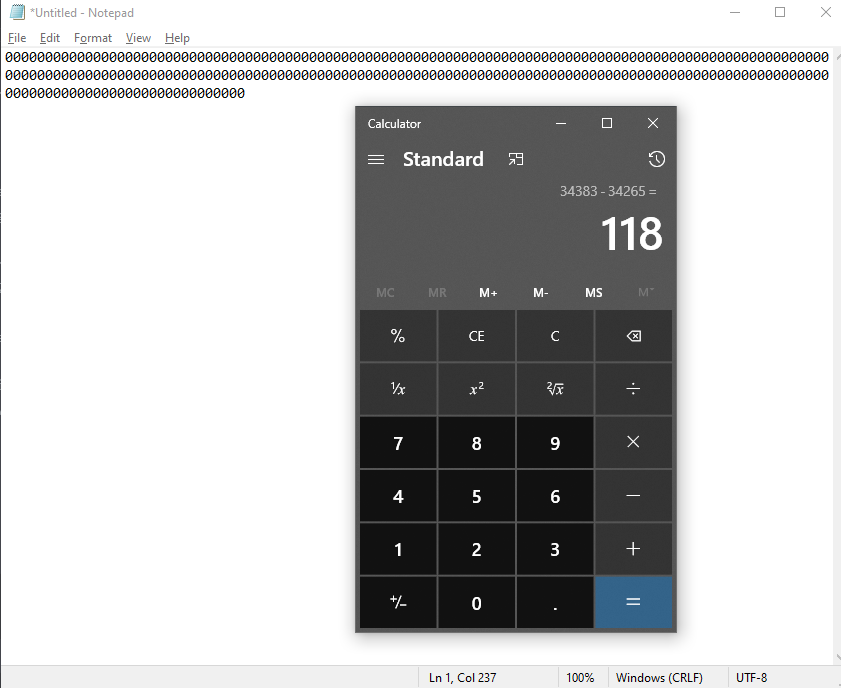
Now go back to the gfx file we exported, Open it in hex editor. Hit Ctrl+A and make sure you are selecting the offsets and not the decoded text. Look at the length of the modified flash file and see how many we need to get back to the original length.

The modified flash file length is 34265
Open a calculator and put the original length first which is "34383" and subtract it to the modified files length which is "34265". The result we get here will tell us how many values we need to put back. We should get a result of "118", Now open up notepad and just put 118 zeroes. You can tell how many by looking at the bottom-left corner of the notepad window it should say the line and the column, The column tells how many zeroes you've put. After putting 118 zeroes, Copy it and paste it again to double the length then add an extra 2 zeroes at the end you should have 237 zeroes now. We needed to double the length because one Null is 2 zeroes, And the 2 zeroes at the end is just for the extra value missed.
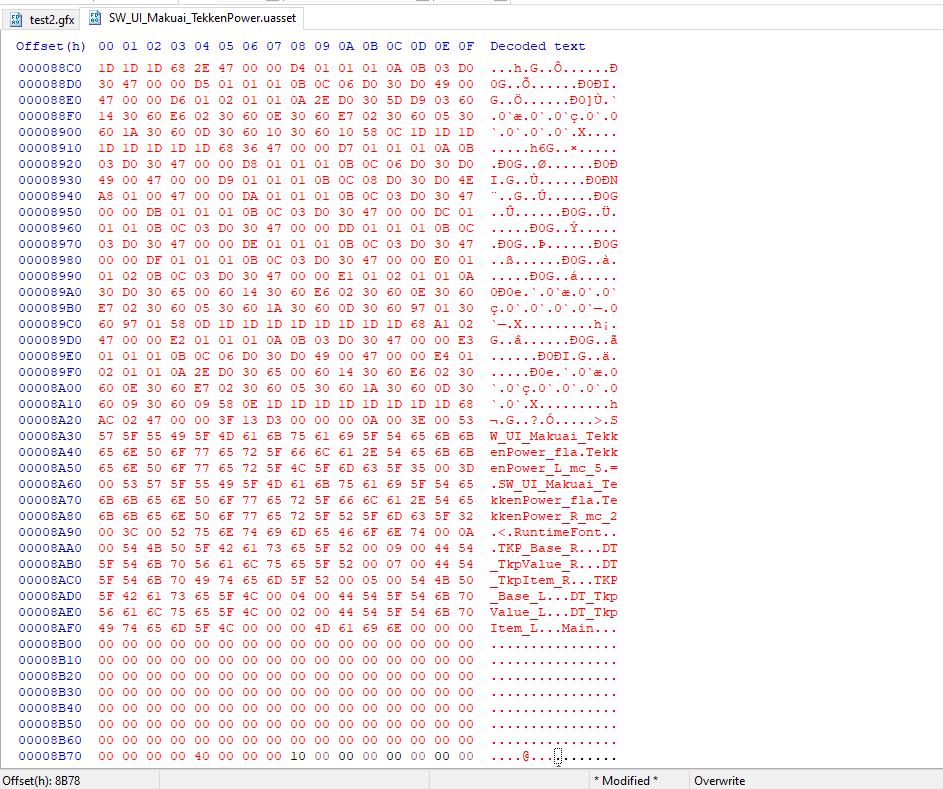
Copy all the zeroes and paste it before "40 00 00 00" offset, If it says file size would change click "Ok". After pasting it, hit Ctrl+A. As you can see the file is now back to the original length which is "34383".

We can now copy it and paste to the original uasset while still highlighting the original flash file. After pasting, It shouldn't say the file size is gonna change as it should have the same length as the original. Now save your modified uasset and put it in your pak file.
That's it! The Tekken Prowess is now removed on the vs screen.

Again, Here's the link if you want to inspect it or want to just use it lol.
Mod Link: No Prowess on VS Screen
Some Notes: If you somehow increase the file size instead of a decreased one, You'll need to remove a useless tag in order to free a space for the increased size. I haven't experimented more about it yet.
Extra Step: See text on UIs, or make it readable and see more animations
An extra step is needed to see the text on the UI and know better about the tag hierarchy on the GFX file.
Step 1:
Download the SWF files of gfxfontlib and gfxgaijilib here and extract it: fontlib.7z
These files are used as a library for the gfx files to depend on, gfxfontlib is the library for the tekken fonts and gfxgaijilib is the library for the ingame button ui. Place it inside FFDec directory for easy access.
Step 2:
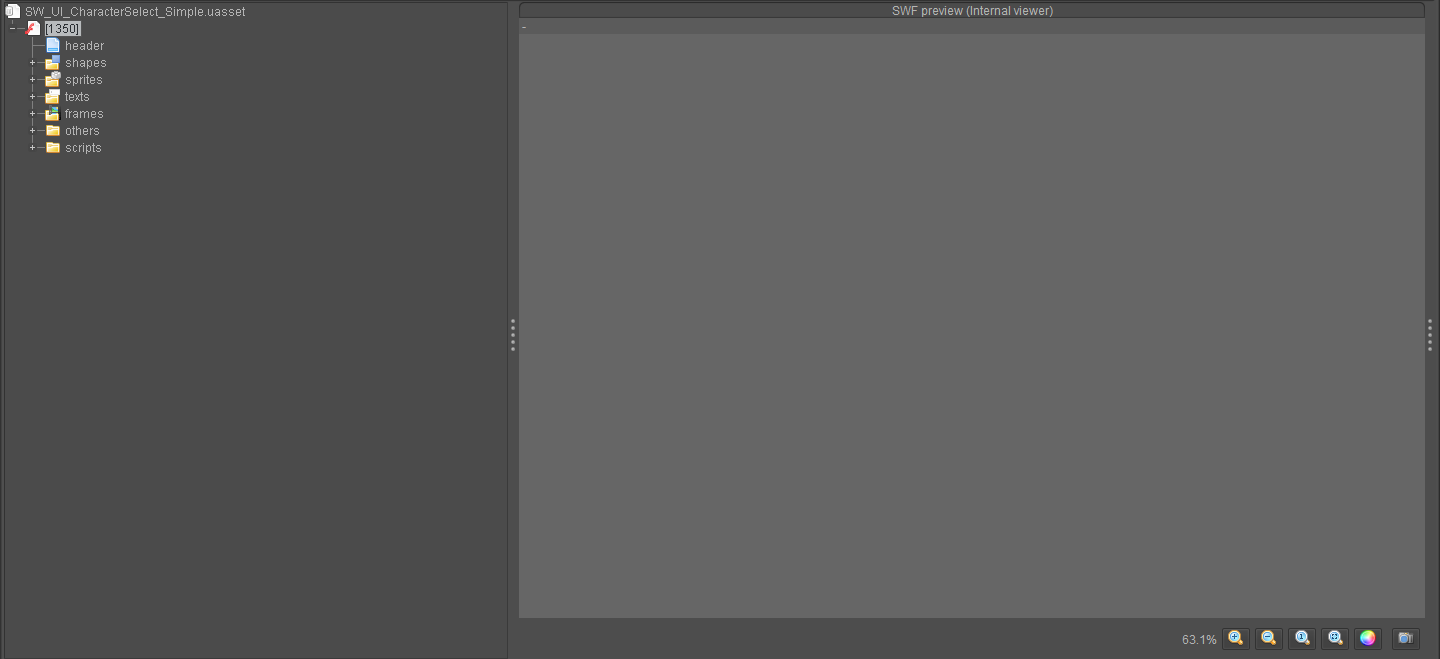
Now let's move into how we use it, For this example I'm just gonna use the "SW_UI_CharacterSelect_Simple" file. First import the uasset file inside the program, It should open a blank preview because it doesn't have the swf dependencies. But you can still see the shapes and sprites animations.
Step 3:
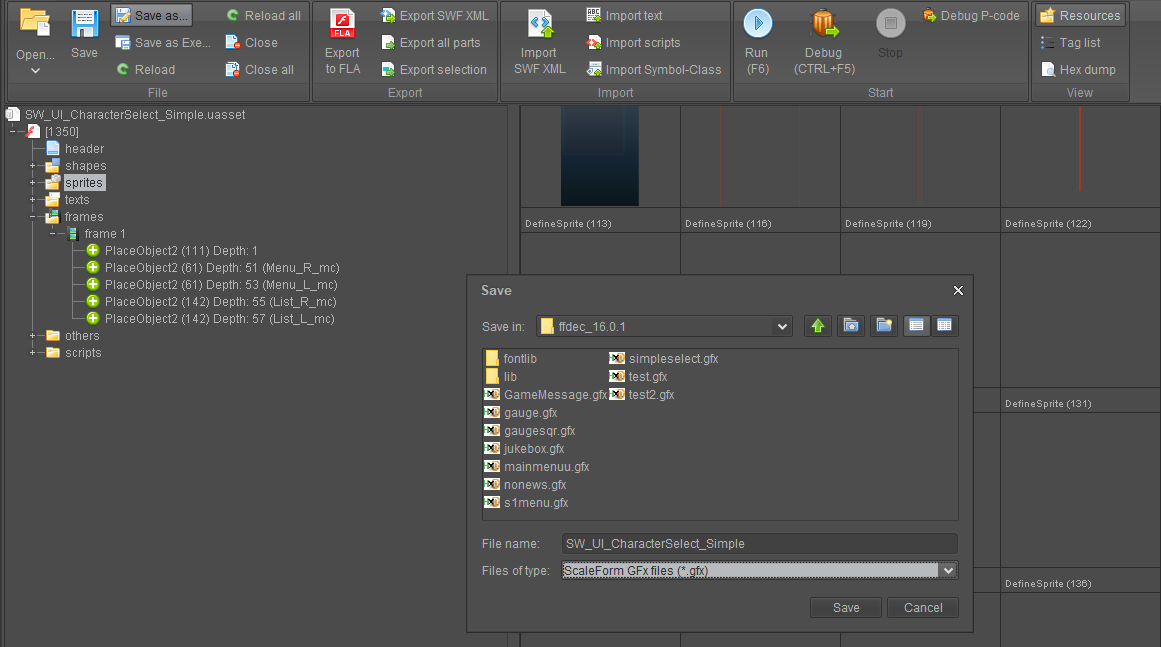
Once opened we need to export it to remove the uasset headers of the file. (You can do this manually with hex but I just do it inside the program) Click Save As and put it inside the FFDec directory so it can be easily used. Let's rename it to the original for now. Just select "ScaleForm GFx files" Since it is the file type used for T7 UI.
Step 4:
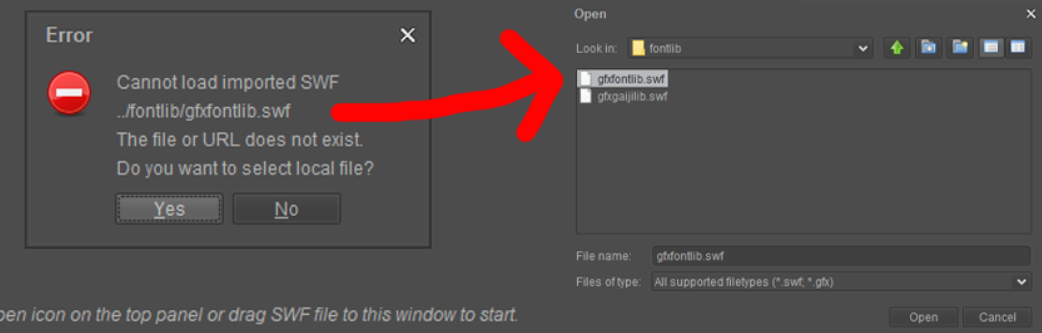
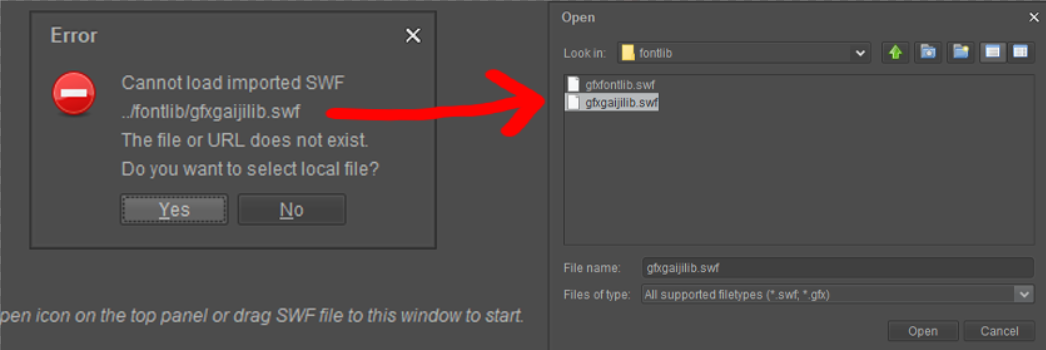
Now that we have our exported gfx file we can now try opening it inside the program. You can close the opened uasset now, and open up the exported gfx file. Once opened you can see an error that it cannot load an imported swf file. Click yes and just select local file as we can load it ourselves.

For most cases it only asks for gfxfontlib but sometimes it also asks for both gfxfontlib and gfxgaijilib. So make sure to select the right file it asks. For the file "SW_UI_CharacterSelect_Simple" it only asked for gfxfontlib.
it asks for gfxfontlib
this one asks for gfxgaijilib
Wait for the program to finish importing and voila! You can now see the texts and fonts used by the gfx file. If you want you can even change those fonts to whatever you like, not sure how it would work though lol. Now this should help you more in modding the UI files and maybe open more possibilities :)


Caveats/Limitations
Problems with flash modding is that it is not stackable. Here's an example, Let's say I got a mod that removes the News in the Main Menu. Then I have another mod that removes the slanted buttons in the main menu. The problem is both mods are modifying the same Flash file. Because of this you'll need to pick one to remove and one to keep.